What’s new Link to heading
This is a continuation of my inclinometer, where I talk about my objective, the software developed and also how I integrated it into my beloved Pajero.
After this work, I still felt that there were multiple improvements to achieve and some very annoying bugs that don’t show up on the test bench and I cannot diagnose due to how random they are.
So, what did I do? I let scope creep get the better of me, instead of only fixing the issues, I increased the features 😄
Between the version I used for vehicle integration CarTSmD-v1.0.0, and the current CarTSmD-v1.2.0 version, a lot has changed, here’s the list:
- Fixed multiple issues that could lead to panic and resets
- Added a new Inclinometer screen and zero out functionality
- Created a new configuration and wifi screens
- Added Wifi provisioning and wifi management state machine
Fix the panic! Link to heading
During vehicle integration testing, I encountered random resets and panic events that were incredibly hard to diagnose. They didn’t happen consistently on the test bench, which made debugging a nightmare. After some investigation, I discovered the culprit: stack overflow caused by excessive logging in the WiFi event handlers.
The problem was in the WifiManager component. Every time a WiFi event occurred (scanning, connecting, disconnecting), the event handler would trigger detailed logging with formatted strings. Since event handlers typically run in interrupt or callback contexts with limited stack space, the accumulation of log buffers and format operations would overflow the stack, causing the system to panic and reset.
The fix was straightforward but effective:
- Reduced logging verbosity in
WifiManager::storeAPPoints()by replacing detailed per-AP logs with a single summary log after scanning completes - Simplified event handler logging by removing format strings and complex operations from disconnect and scan-done event handlers
- Minimized stack usage in critical event-driven code paths
This approach follows the principle that logging in interrupt/event contexts should be as lightweight as possible. Instead of logging every detail, we now log a summary after the critical operation completes, keeping the event handler itself lean and stack-efficient.
After these changes, the random panics disappeared completely, and the system has been stable through extensive vehicle testing.
New Inclinometer and where is ground Link to heading
Where is Ground? Link to heading
One of the issues that I didn’t consider before going into the car was that the actual display would be slightly tilted, which in hindsight makes sense, because the displays are skewed towards the better angle to the user.
Another reason is the mounting; it’s plastic and has a bit of play, which means that the screen might appear a bit tilted, but not much that I would consider a brand new plastic support.
So, how did I fix this?
The right answer was to include a zeroing functionality to the inclinometer, so that in any moment in time, I can include an angle offset to the inclinometer angles.
In the code, it looks like this:
// Calculate raw pitch and roll from accelerometer
out.roll  = atan(mask) * RAD_TO_DEG;
out.pitch = atan2(acc.z, acc.x) * RAD_TO_DEG;

// Apply offset (zero out the reference position)
out.roll  -= RPOffset.roll;
out.pitch -= RPOffset.pitch;
The RPOffset is nothing more than a set of roll and pitch I grabbed while on a horizontal plane and stored in the NVM.
The data flow diagram for this use case looks like this:
init()"] --> B["Load Stored Offset
getStoredOffset()"] B --> C["RPOffset = loaded values - or 0,0,0 if not found"] D["User Calibration
setInclinometerOffset()"] --> E["Reset RPOffset to 0,0"] E --> F["Read Current Position
getPitchAndRoll"] F --> G["Capture as Offset
RPOffset = rp"] G --> H["Store to NVS
setStoredOffset"] H --> I["Next Power-on:
Offset is reloaded"] J["Continuous Operation
read_sensor_data()"] --> K["Get Raw Accelerometer Data"] K --> L["Calculate Pitch & Roll"] L --> M["Apply Offset
angle -= RPOffset"] M --> N["Output Corrected Angle"] C -.-> M I -.-> C
setStoredOffset"] --> B["NVS Handle
QMIOffset"] B --> C["int32 Roll"] B --> D["int32 Pitch"] C --> E["ESP32 Flash"] D --> E F["Boot/Init"] --> G["getStoredOffset"] G --> B B --> H["Restore to Memory
RPOffset"]
So in short, the flash storage and retrieve is done in the following way:
Writing Offset to Flash (setStoredOffset):
- Open NVS namespace
"QMIOffset"in READ_WRITE mode - Cast float roll/pitch to int32_t
- Store using
nvs_set_i32()with keys"QMIOffsetRoll"and"QMIOffsetPitch" - Commit changes to flash using
nvs_commit() - Close NVS handle
Reading Offset from Flash (getStoredOffset):
- Open NVS namespace
"QMIOffset"in READ_ONLY mode - Retrieve int32_t values using
nvs_get_i32()for both roll and pitch - Cast back to float
- Return as
std::optional<RollPitch>(null if not found) - Close NVS handle
For this use case, the std::optional<> is very useful. It allows you to safely handle cases where a value might not exist, very similar to what Rust does with its Option type.
In most typical embedded approaches (where C is king), you’d have to handle “no value” situations in messy ways: returning a null pointer (dangerous with value types), using a error value, or returning a boolean and using an output parameter. With std::optional, the intent is crystal clear—the value either exists or it doesn’t.
In our inclinometer offset case, when the system boots for the first time, there’s no stored offset in flash yet. The getStoredOffset() method returns std::optional<RollPitch>:
std::optional<RollPitch> getStoredOffset() {
    RollPitch storedOffset;
    esp_err_t nvs_err;

    nvs_handle_t nvsHandle;

    nvs_err = nvs_open("QMIOffset",NVS_READONLY,&nvsHandle);
    if (nvs_err != ESP_OK) {
        ESP_LOGE(QMI8658C_TAG, "Error (%s) opening NVS handle!", esp_err_to_name(nvs_err));
        return std::nullopt;
    }

    ESP_LOGI(QMI8658C_TAG,"Reading Roll");
    int32_t lRoll;
    nvs_err = nvs_get_i32(nvsHandle,"QMIOffsetRoll",&lRoll);
    switch (nvs_err) {
        case ESP_OK:
            ESP_LOGI(QMI8658C_TAG, "Read Roll = %" PRIu32, lRoll);
            break;
        case ESP_ERR_NVS_NOT_FOUND:
            ESP_LOGW(QMI8658C_TAG, "The value is not initialized yet!");
            break;
        default:
            ESP_LOGE(QMI8658C_TAG, "Error (%s) reading!", esp_err_to_name(nvs_err));
    }

    ESP_LOGI(QMI8658C_TAG,"Reading Pitch");
    int32_t lPitch;
    nvs_err = nvs_get_i32(nvsHandle,"QMIOffsetPitch",&lPitch);
    switch (nvs_err) {
        case ESP_OK:
            ESP_LOGI(QMI8658C_TAG, "Read Pitch = %" PRIu32, lPitch);
            break;
        case ESP_ERR_NVS_NOT_FOUND:
            ESP_LOGW(QMI8658C_TAG, "The value is not initialized yet!");
            break;
        default:
            ESP_LOGE(QMI8658C_TAG, "Error (%s) reading!", esp_err_to_name(nvs_err));
    }

    if(nvs_err!=ESP_OK)
    {
        nvs_close(nvsHandle);
        return std::nullopt;
    }
    else
    {
        storedOffset.pitch = static_cast<float>(lPitch);
        storedOffset.roll = static_cast<float>(lRoll);
        nvs_close(nvsHandle);
        return std::optional<RollPitch>(storedOffset);
    }
}
Then in the caller, instead of multiple if cases handling the exceptions, in one line I can define the expected reaction to all use cases:
    {
        std::lock_guard<std::mutex> lock(RPOffsetMutex);
        RPOffset = getStoredOffset().value_or(RollPitch{0,0,0});
    }
This is much more expressive than older approaches. Just like in Rust where you must explicitly handle the Some and None cases, C++’s std::optional makes the compiler aware that the value might not exist, helping prevent bugs where you accidentally use an uninitialized value. It’s defensive programming that reads naturally.
New Inclinometer screen Link to heading
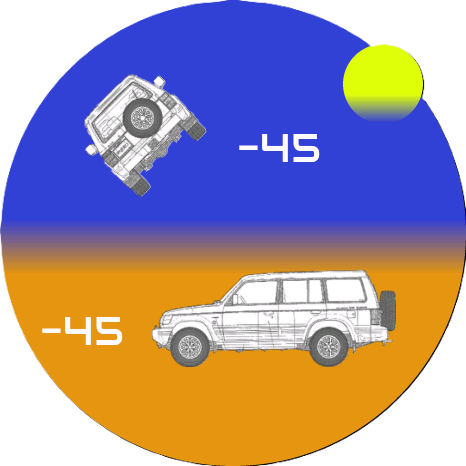
To introduce the reset button, I also wanted to create a new inclinometer screen. The last one had very good performance and gave me the exact information I wanted. From an engineering perspective, that’s good enough, but it’s not pretty and not flashy. So I entirely created a new screen. I wanted to have something that shows a small picture of my car and also look colorful. After sleeping on the topic, I came up with this design:
New Inclinometer
Pretty schwifty right? 😄
On the top we can see the roll, both the real value and also a rotating silhouette and on the bottom it shows the pitch in the same fashion.
I had to find a way to include the reset button without breaking the visuals, so I thought, what if I build the screen where we see a sandy horizon and the sun peeking on the top is my reset button?
I think it turned out pretty cool, and much more artistic than what I’m used to creating.
New Configuration screen Link to heading
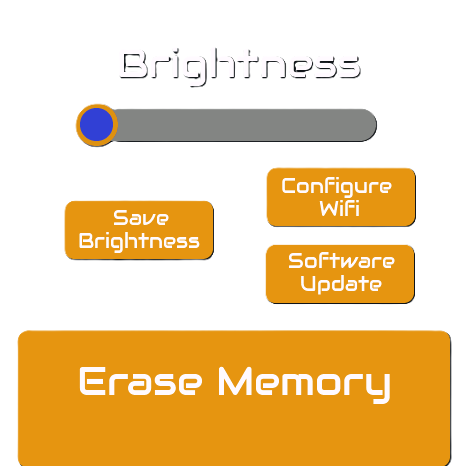
I also wanted to create a new configuration screen with features like brightness control and the ability to erase the entirety of the stored flash.
It also made sense that both wifi configuration and OTA update screens should be available to the user out of this screen.
Therefore, this is what I came up with:
New Configuration Screen
I don’t really understand why, but Squareline exports the screen in a rectangular shape. Of course, in the real application the screen is round.
Wifi Provisioning and why I didnt do this earlier Link to heading
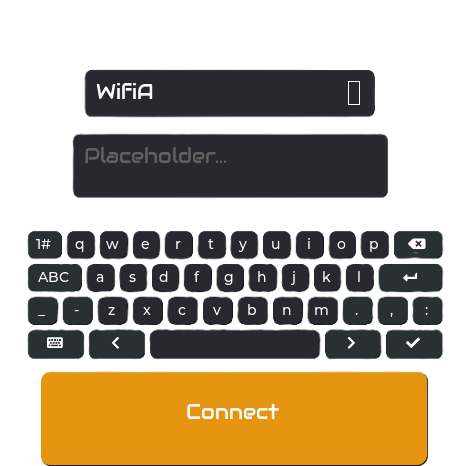
So in the old application, the only way to connect to a WiFi network was either by using the hardcoded connections, or by writing the password on this tiny screen, which proved difficult.
Manual Wifi setup
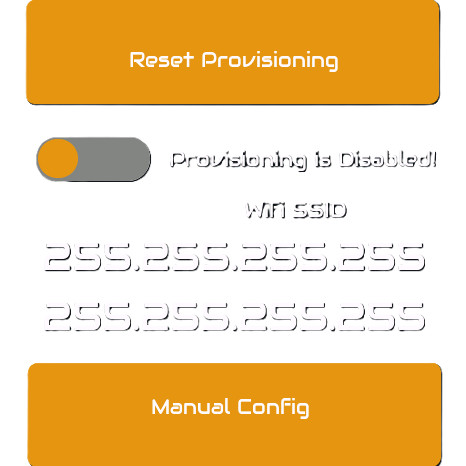
Luckily, I stumbled into the ESP provisioning library. To be honest, I have no clue why I didn’t find this earlier, but this should be my strategy from the beginning.
New Wifi Setup
Therefore, this brought huge changes to the wifi manager state machine.
The State Machine Approach Link to heading
The old WiFi code was basically a mess of if-else statements and flags scattered all over the place. The new approach uses a finite state machine (FSM) to manage WiFi provisioning and connection, which is a much cleaner way to handle all the different scenarios the system needs to deal with.
Instead of having loose code trying to manage everything at once, the state machine has discrete states that the WiFi manager moves through. Each state has specific entry/exit conditions and knows exactly what to do. This makes the code way more predictable and testable.
Here’s the complete state machine flow:
System startup
NVS/WiFi initialized"] READY_PROV["READY_TO_PROVISION
No stored WiFi credentials
Waiting for provisioning"] PROVISIONING["PROVISIONING
SoftAP active (PROV_SSID)
Listening for mobile app"] PROVISIONED["PROVISIONED
Credentials received
Deinit provisioning mgr"] READY_CONNECT["READY_TO_CONNECT
Credentials loaded
Ready for connection"] SCANNING_READY["SCANNING_READY
Preparing WiFi scan
esp_wifi_set_mode(STA)"] SCANNING["SCANNING
WiFi AP scan in progress
esp_wifi_scan_start() running"] SCANNING_DONE["SCANNING_FINISHED
Scan results available
Checking for known networks"] CONNECTING["CONNECTING
Attempting connection
esp_wifi_connect() called"] CONNECTED["CONNECTED
Associated + IP acquired
Ready for application"] DISCONNECTED["DISCONNECTED
Lost WiFi connection
Will retry scanning"] CONN_FAILED["CONNECTION_FAILED
Connection attempt failed
Will retry or restart"] %% First Boot Path (Unprovisioned) INIT -->|"No provisioning in NVS"| READY_PROV READY_PROV -->|"WifiManagerTask():
switch(READY_TO_PROVISION)"| PROVISIONING %% Provisioning Flow PROVISIONING -->|"NETWORK_PROV_WIFI_CRED_RECV"| PROVISIONING PROVISIONING -->|"NETWORK_PROV_WIFI_CRED_SUCCESS"| PROVISIONED PROVISIONING -->|"NETWORK_PROV_WIFI_CRED_FAIL"| PROVISIONING PROVISIONING -->|"NETWORK_PROV_END"| PROVISIONED PROVISIONING -->|"WifiProvAppCallback():
credentials stored"| PROVISIONED %% After Provisioning/Auto-Connect Path INIT -->|"Provisioning in NVS"| PROVISIONED PROVISIONED -->|"Load WiFi config
from NVS"| READY_CONNECT %% Manual Connection Path READY_CONNECT -->|"WifiConnectRequest(ssid, pwd)"| CONNECTING %% Scanning Path READY_CONNECT -->|"No known networks yet
Start scan"| SCANNING_READY SCANNING_READY -->|"changeStatus()
Initiate scan"| SCANNING SCANNING -->|"pendingScanResults_
flag set by ISR"| SCANNING_DONE SCANNING_DONE -->|"Known SSID found
in scan results"| READY_CONNECT SCANNING_DONE -->|"No known SSID found
Retry scan"| SCANNING_READY SCANNING_DONE -->|"Already transitioning
to CONNECTING"| CONNECTING %% Connection Path READY_CONNECT -->|"Auto-connect to
provisioned SSID"| CONNECTING CONNECTING -->|"WIFI_EVENT_STA_CONNECTED"| CONNECTING CONNECTING -->|"IP_EVENT_STA_GOT_IP"| CONNECTED %% Online State CONNECTED -->|"Periodic polling
Every 1000ms"| CONNECTED CONNECTED -->|"WIFI_EVENT_STA_DISCONNECTED"| DISCONNECTED %% Recovery Paths DISCONNECTED -->|"WifiManagerTask():
switch(DISCONNECTED)"| SCANNING_READY CONN_FAILED -->|"Manual retry or
auto-restart"| SCANNING_READY
First-Boot (Unprovisioned) Flow:
When you first power on the device, it has no WiFi credentials stored. This triggers the provisioning flow:
- Device enters
READY_TO_PROVISIONstate and creates a SoftAP (Software Access Point) with a name likePROV_XXXXX - You connect to this WiFi hotspot from your phone or computer
- The ESP provisioning library handles the UI to let you enter your home WiFi SSID and password
- Device transitions to
PROVISIONINGstate, attempting to connect with those credentials - On success, it moves to
PROVISIONEDstate and stores the credentials in NVS (Non-Volatile Storage) on the flash - From then on, it never needs provisioning again
Conclusion Link to heading
From v1.0.0 to v1.2.0, this project evolved from a basic inclinometer with wifi into a robust usable inclinometer with wifi. The panic fixes taught me that even debug logging in event handlers can wreak havoc and let the main task handle it. The offset feature makes the inclinometer truly practical for the application, and the WiFi provisioning refactor transformed it from clunky to actually usable.
Sometimes scope creep gets you closer to what you actually needed all along.
If you found this project interesting or useful, please consider supporting my work: